Hot-forming dies and high-load tooling can be evaluated for LMD repair when damage is local, the base material and heat-treatment condition are understood, and the repaired zone can be finished and inspected. This page is a generalized application guide for hot-work tooling and forming components.
Part types this guide covers
This guide is relevant for hot-work tooling and forming components where local wear or heat damage drives replacement pressure.
Typical part names include:
- hot-forming dies;
- forging dies;
- die inserts;
- trimming tools;
- press tooling;
- forming jaws;
- mold or die surfaces;
- hot-work tool edges;
- local wear pads or contact zones on tooling assemblies.
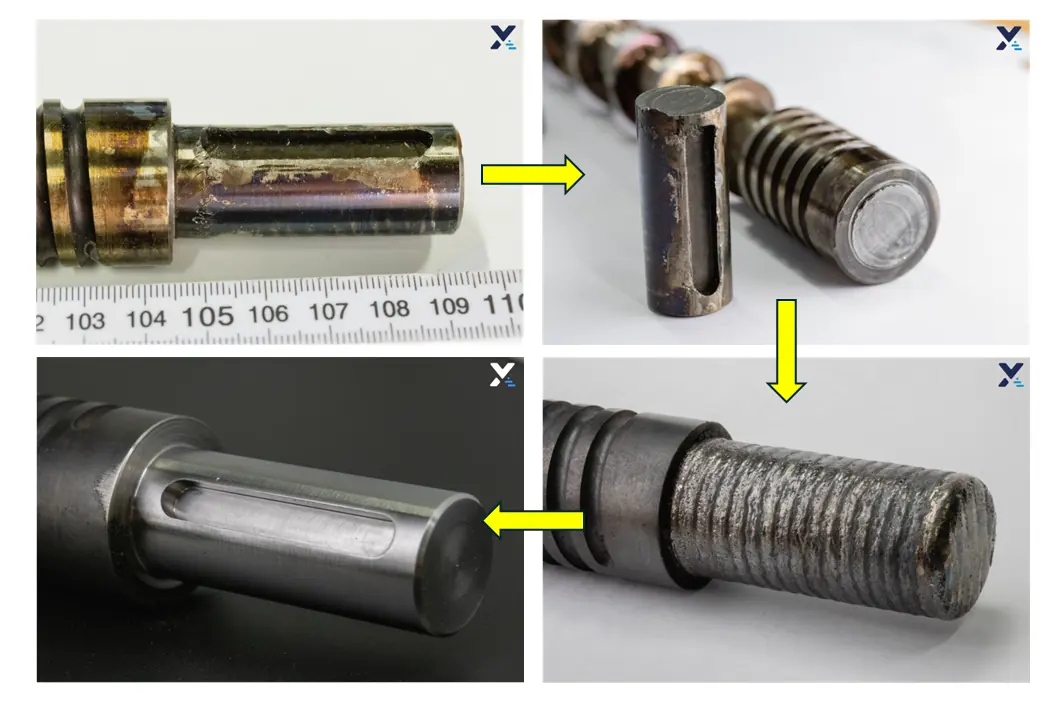
These parts are usually evaluated because the tool body still has value, but a working zone has lost geometry or surface performance.
Problems that can make LMD relevant
LMD repair can be worth discussing when the problem is local and measurable:
- dimensional loss in a forming zone;
- worn edges or radii;
- heat checking or thermal fatigue near the surface;
- local cracks that can be removed or prepared before rebuild;
- machining error on a tool surface;
- damage on a zone that will be finished after repair;
- repeated replacement caused by a predictable wear zone.
The review should start with the tool duty cycle and failure mode. A die that fails by local wear is a different problem from a die with deep fatigue cracking or unknown heat-treatment history.
Repair route
A hot-tooling repair route usually needs more control than a simple build-up job.
The main steps are:
- Review tool material, heat treatment, duty cycle and damaged surface.
- Decide whether repair, replacement, conventional welding or redesign is the practical route.
- Prepare the damaged zone and remove unsuitable surface condition.
- Select the material family around substrate compatibility, heat exposure, toughness and wear.
- Deposit material locally with LMD.
- Machine, grind or polish the zone to the required working geometry.
- Inspect the result and decide what evidence is needed before the next production cycle.
Preheating, post-heating or heat treatment may be relevant, but those steps should remain project-specific until the tool material and acceptance criteria are known.
Material direction and problem links
Tooling material selection should not be reduced to a headline hardness number. Hot-forming work needs a balance between wear resistance, toughness, heat-checking behavior, crack risk, machinability and compatibility with the base tool.
Useful starting points:
- Materials overview for Fe-based, Ni-based, Co-based and carbide-reinforced discussion routes.
- Material selector for an early route from wear, heat or impact duty to a material-family shortlist.
- Metallurgical validation for bond, dilution, microstructure and crack-risk questions.
- LMD for hard-to-machine alloys where tool material and finishing effort matter.
- Quality and inspection for evidence planning.
What must be verified
For hot-forming die and tooling repair, the validation stack should fit the risk of the tool.
Useful checks can include:
- base material and heat-treatment state;
- crack review before deposition;
- repair-zone measurement;
- final geometry after machining or grinding;
- surface condition;
- hardness context where relevant;
- microstructure or metallographic review where the risk justifies it;
- documentation of the accepted repair boundary.
The repaired die should not be presented as better than new unless the claim is supported by approved test data, service data or a defined trial.
When another route may be better
LMD may not be the right route when:
- the die has deep systemic cracking;
- the base tool material is unknown;
- the heat-treatment state cannot be handled;
- the damaged zone cannot be reached or finished;
- replacement tooling is cheaper and faster;
- the customer requires certification or evidence that has not been planned;
- the tool is near end of life outside the local damaged zone.
What to send for review
Send photos of the die or tool, drawing or CAD if available, base material, heat-treatment information, damaged-zone dimensions, operating temperature context, failure history, required final geometry, production deadline and required inspection evidence.
CTA
Send tooling photos, material information and the worn-zone geometry for a repair route review.